
Clash Squad is where Free Fire's real skill gap lives. In 2026, with the OB52 patch in full swing, the round-based 4v4 mode continues to strip away Battle Royale's randomness—no zone luck, no 20-minute loot phase, no sneaking into a top-10 placement with zero kills. Every round reduces the game to aim, positioning, decision-making, and economy. As veteran players often say, if a player loses, it's almost always because their opponent outplayed them on at least one of those four fronts. It's not rocket science; it's execution.

The Four Roles That Define Pro Play
Random squads lose because everyone plays the same way. Four players rushing independently isn't aggression—it's noise. Pro CS squads always have defined roles:
| Role | Responsibility | Characters | Weapons |
|---|---|---|---|
| Entry Rusher | First through every door, creates space | Tatsuya, Kelly | MP40, M1887 |
| Support/Utility | Gloo walls, flashbangs, revives | Dimitri, Thiva | UMP, SCAR |
| Anchor/IGL | Holds angles, calls enemy positions | Chrono, Alok | M4A1, AK-47 |
| Sniper/Opener | Longest sightlines, softens targets | Laura, Rafael, Maro | AWM, Woodpecker |
In solo queue, players should play Anchor. They hold angles, call positions in chat, and let the randoms rush. They clean up.
The Coin Economy: Where Matches Are Won
This is the single most important system in CS Rank, and it's the one most players below Diamond completely ignore. The economy compounds. Winning Round 1 gives more coins for Round 2. Losing leaves a team making hard choices with 800 coins while the enemy rolls in with full SMGs and Level 2 armor. One bad pistol round can cascade into three consecutive losses if a team doesn't know how to manage an eco round.
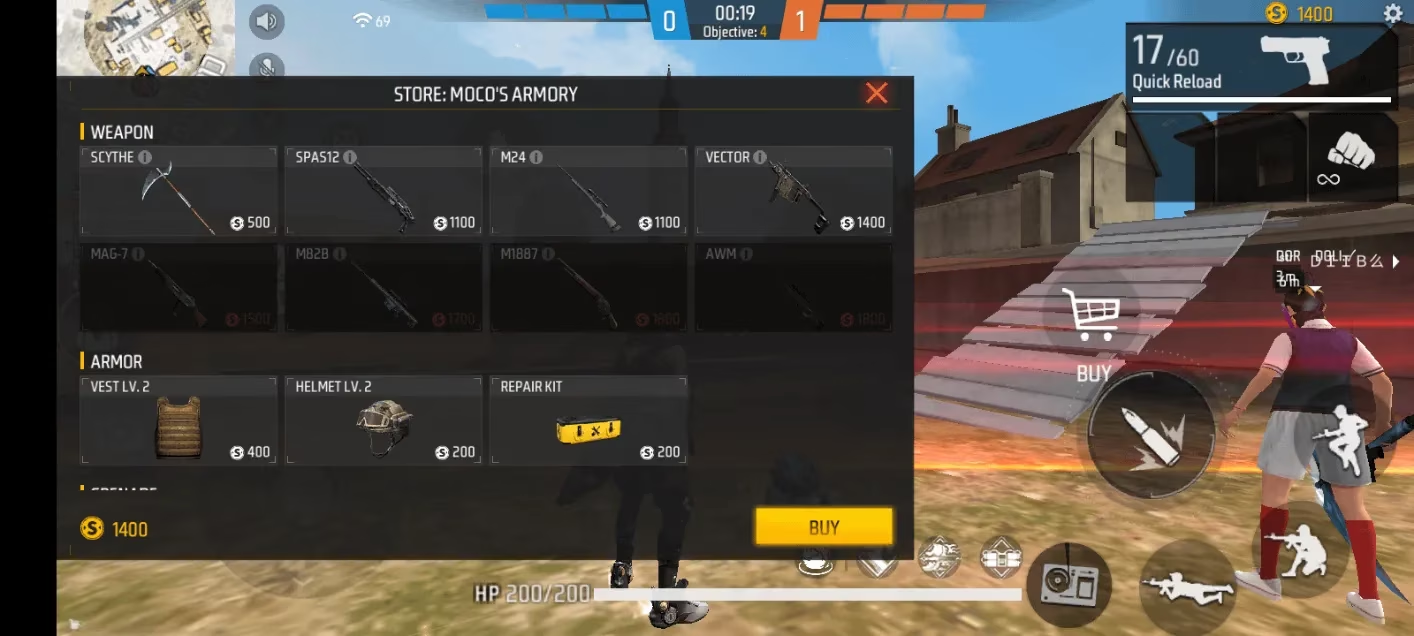
Round 1 (500 coins) – The Pistol Round
-
M500 (400 coins): One headshot kills an unarmored enemy. High risk, high reward.
-
Double USP (free) + Gloo Wall (300 coins): The USP fires faster than the G18 and costs nothing. Players should spend their 500 coins on utility instead.
-
Do not buy the G18. It's objectively worse than the free Double USP. Spending 300 coins to downgrade a pistol is a mistake.
Round 2 – Win Scenario (Force Round)
With 1,500–2,000 coins, buy an MP40 or Thompson, a Level 2 Helmet, and one gloo wall. That team now has a massive gear advantage over an enemy who may still be on pistols.
Round 2 – Loss Scenario (Eco Round)
With around 800 coins, do not panic buy. Get a Desert Eagle (800 coins) and play passively. The goal is one lucky headshot to steal an enemy weapon when they push. That stolen MP5 becomes the Round 3 buy.
The Drop System (Teams Only)
Check teammates' coin counts before buying. If a team has 4,000 coins total and one player has 300, buy two guns and drop the cheaper one for them. A team where everyone has a real weapon beats a team where three players are rich and one plays with a pistol, every single time.
Round 7 – The Final Round
Spend every coin. Repair the vest. Buy mushrooms to top off EP before using Alok or K's skills. Stack grenades. There is no "next round" to save for.
Character Combos for Every Playstyle
CS fights are decided in 3 seconds. Burst abilities are needed, not passive healing that kicks in after a 5-second fight already lost. One active skill slot plus three passive slots.
Combo 1: The Rusher (Diamond to Heroic)
-
Active: Alok – Drop the Beat gives a 5-second heal aura plus 15% movement speed.
-
Passive 1: Kelly (Agility) – +6% sprint speed.
-
Passive 2: Jota (Sustained Raids) – Every knock restores 40 HP.
-
Passive 3: Hayato (Bushido) – Lower HP means higher armor penetration.
How to use it: Activate Alok before crossing open ground. Rush with MP40. Once the enemy is knocked, Jota tops the player back up. Save Alok for the moment of stepping into a fight, not while in cover.
Combo 2: The Defensive Anchor (All Ranks)
-
Active: Chrono – Time Turner deploys a shield that blocks up to 600 damage.
-
Passive 1: Rafael (Dead Silent) – Shots are auto-silenced when scoped.
-
Passive 2: Laura (Sharp Shooter) – Increases accuracy when scoped in.
-
Passive 3: Maro (Falcon Fever) – Damage scales with distance on marked enemies.
How to use it: Hold the longest sightline. Fire. When enemies rush, pop Chrono shield, reposition behind it while Rafael silences the shots. This works even at Heroic where enemies actively listen for shot directions.
Combo 3: The Revive Engine (Squads Only)
-
Active: Dimitri (Healing Heartbeat) – Creates a healing zone where knocked teammates can self-revive.
-
Passive 1: Thiva (Vital Vibes) – Increases revive speed by 70% and heals the revived player.
-
Passive 2: Jota (Sustained Raids) – Keeps the player alive while securing knocks.
-
Passive 3: Kelly (Agility) – Speed to reach knocked teammates.
How to use it: When a teammate goes down, activate Dimitri, drop a gloo wall around them, and let them self-revive. This negates one knock per round if timed correctly. Counter it with grenades thrown directly at the Dimitri zone.
Map Control on the Three Main CS Maps
Clock Tower
Bottom-spawn team pushes uphill into sightlines controlled by the top team. If spawning bottom, go wide left toward the Black House—a two-story building overlooking both the tower base and the enemy's approach. Control that building first round to neutralize the height disadvantage. If spawning top, send the sniper to the tower railing immediately. Against a Chrono user, do not push the shield. Wait 4 seconds, then rush with two players from different angles.
Factory
The middle container yard is a death trap. Both teams have sightlines into it from above. Never walk through the middle in rounds 1–4. Take the yellow metal stairs on the far edges to reach the second-floor railing. Pre-cook grenades for stairwell pushes.
Pochinok
The concrete house with tires in the back quadrant is the highest-value control point. Use the tires to jump onto the roof. Enemies almost never look up. If the enemy takes the roof first, use a flashbang to blind them, then push while they're disoriented.
Common Mistakes That Stall Players at Diamond
-
Peeking the same angle twice. Reposition 2–3 steps sideways before peeking again.
-
Rushing without information. The sniper should hit someone before the rusher moves.
-
Saving coins when 0-3. A losing streak bonus equalizes buying power. Full-buy in Round 4.
-
Using BR characters in CS. K and Ford are great in Battle Royale but too slow for CS's 3-second fights.
-
Reactive gloo walls. Place walls before a push, during a reload, or as bait—not when already dying.
Quick FAQ
What is the best character for CS Rank? Alok is the most reliable active skill because Drop the Beat provides both healing and speed. Chrono is a strong alternative for defensive players.
How many gloo walls per round? Minimum 2. In rounds 5–7, 3–4 walls is standard.
How to win with random teammates? Play Anchor. Hold angles, call positions, and drop weapons for broke teammates in rounds 2 and 3.
Best weapon combo? MP40 + M1887 for close-range dominance, or SCAR + UMP for versatile range control.
When to eco vs. force buy? Eco when the previous round was lost and the team has under 1,000 coins. Force buy when the previous round was won and the team has 1,500+ coins. Never force buy after two consecutive losses.
The OB52 meta has shifted, but the fundamentals remain. Master the economy, define the role, and control the map. That's how to climb from Diamond to Heroic in 2026.