
There’s something exhilarating about building a personal battlefield in Free Fire, where you’re not just a survivor – you’re the architect of every rule. I’ve seen too many players fumble around the menu like they’ve lost their minimap, simply because the Custom Room feature has shifted a bit after updates. If you’ve ever wanted to host private matches with friends, run in‑house tournaments, or practice lineups without randoms hot‑dropping on your head, this guide is your treasure map. By the time we’re done, you’ll navigate the setup as smoothly as a drag‑flick sniper. Let’s get your own lobby humming.
Think of a Custom Room as a blank canvas where you’re the painter and the gallery owner. You pick the colors (game modes), the frame (maps), and even decide who gets to step in with a VIP password. It’s not just a tool – it’s your own little ecosystem. In 2026, with the ever‑growing esports scene, knowing how to craft this space is like having a private dojo in a world of public brawls. Let me walk you through it.
Step 1: Locate the Hidden Door
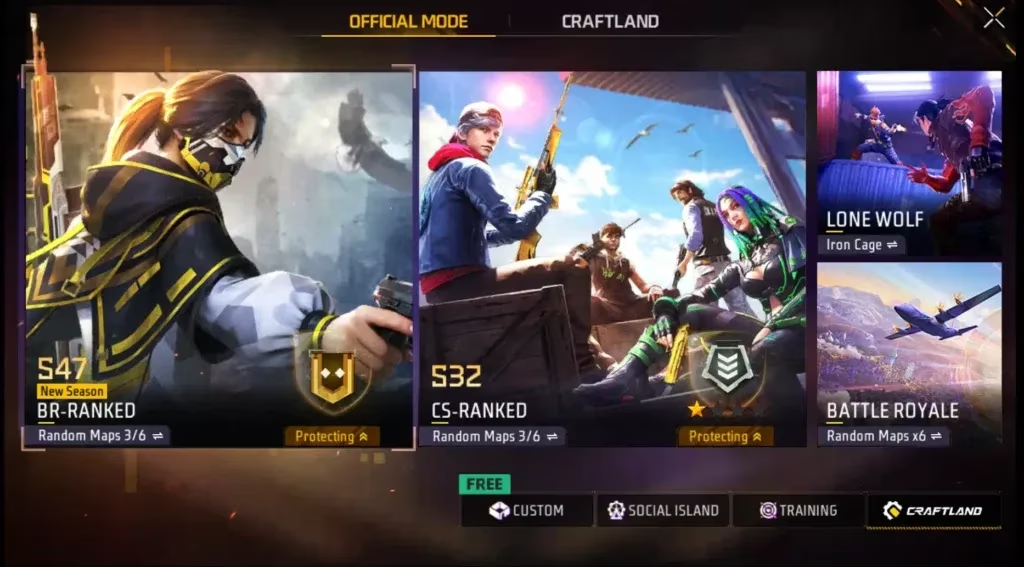
First, fire up Free Fire and land on the main lobby. Don’t rush straight into a match – instead, look towards the Mode Section, the beating heart of variety. On the bottom left of your screen, nestled below the CS Rank icon like a secret passage in an adventure game, you’ll spot the Custom button. Back in the day it was a bit more tucked away, but now it’s quite prominent. Tapping it is equivalent to pulling the lever that opens your own private arena.
Step 2: The Crossroads – Join or Build
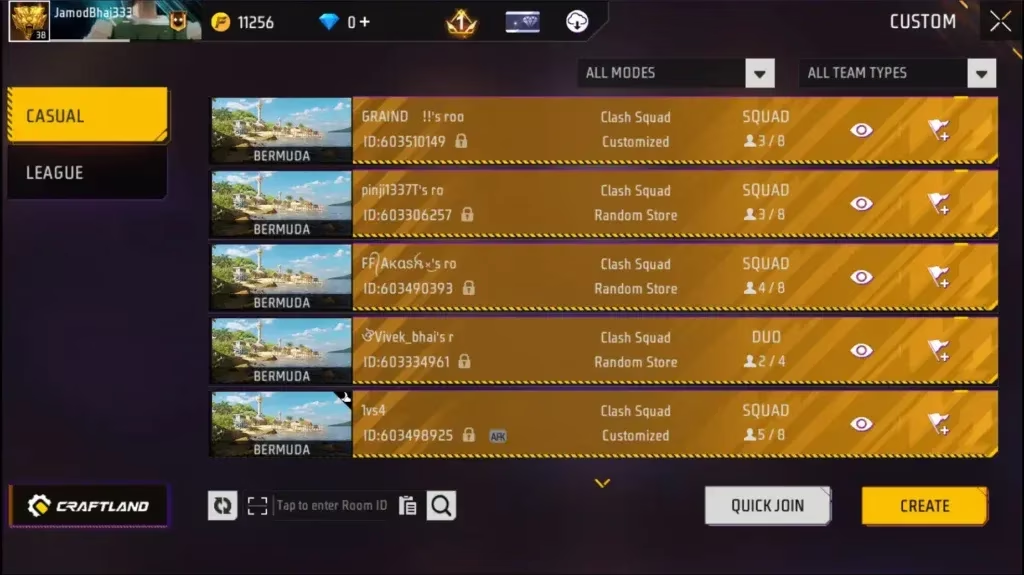
Once you enter the Custom lobby, you’ll see a list of existing rooms like message bottles floating in the ocean. But you’re not here to drift – you’re here to build a ship. At the bottom right, two buttons will stare back at you: Quick Join and Create. Quick Join is great if a friend already has a room code, but today we’re pressing Create. Tapping it feels like selecting “Adventure” in a game menu; the path forward is entirely yours to design.
Step 3: Sculpting the Room Settings – Your Control Panel
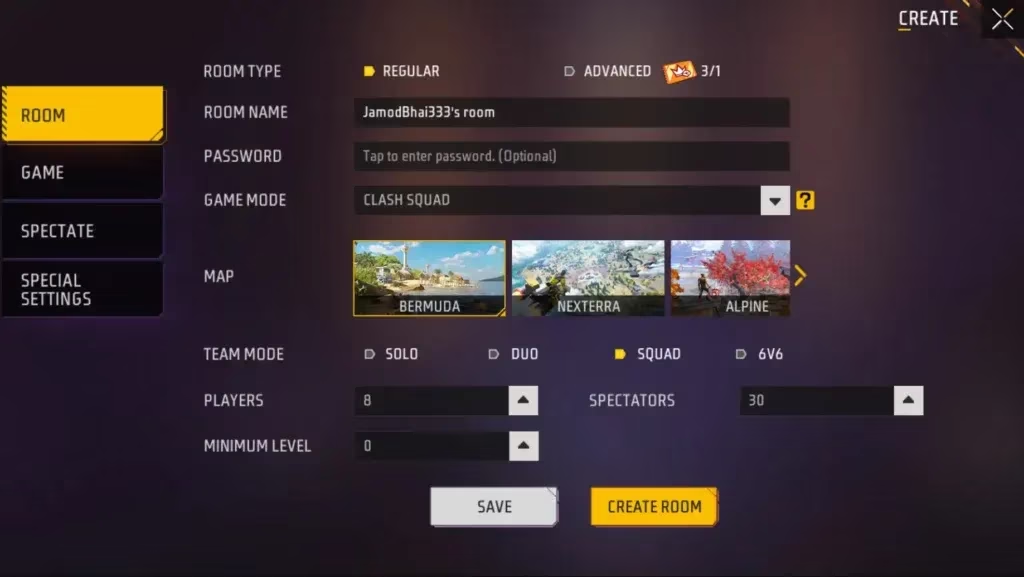
Now you’re in the cockpit. The room settings unfold like a high‑tech dashboard with four tabs: Room, Game, Spectate, and Special Setting. Each one is a lever that shapes the experience. Think of it as setting up dominoes – every decision you make topples into the next, creating the exact chain reaction you want in the match.
Room Tab – Naming and Locking Your Fortress
First, you’ll decide between Regular (for casual fun) and Advance mode (for competitive, tournament‑style matches). The Advance setting unlocks stricter rules and is what most scrims use. Next, give your room a recognizable name – something like “SnipersOnlyArena” or “FridayFragNight”. Then comes the password field. I treat this like setting a secret knock on a club door. Only those with the code get in, so no random grenades from strangers.
Game Tab – Choosing the Flavor
Here comes the real spice. Under Game Mode, you have a buffet: Clash Squad, Battle Royale, Bomb Squad 5v5, Lone Wolf, Team Death Match, Rush Hour, and Battle Cage. Each mode bends the pace of play like changing music genres. For instance, selecting Battle Royale lets you even pick the map – from Bermuda to Kalahari, each terrain demands different strategies. You also define the format: Solo, Duo, or Squad. Set player limits, spectator slots, and a minimum level requirement if you want to filter out brand‑new accounts. I love this part because it’s like setting the stage for a play – you cast the roles and write the rules.
Spectate Tab – Directing the Audience’s Lens
In 2026, viewing parties are huge. This tab lets you decide what your spectators can see: only their own team, or all players. If you’re running a tournament, you might restrict viewing to avoid ghosting. For a fun community event, you might open it wide. It’s reminiscent of a film director choosing which camera angles are shown to the audience – you control the suspense.
Special Setting Tab – The Fine‑Tuning Workshop
Depending on the mode, you can tweak reset timers, item availability, and other granular options. This is where competitive edge gets carved out. Don’t ignore it; even small shifts here can flip a game’s meta on its head.
Step 4: Save or Launch
Once your masterpiece is complete, you’ll see two buttons at the bottom: Save (to store your configuration for later) and Create Room. If you’ve just built the perfect scrim setup, hit Save – you can reload it instantly next week. When you’re ready for action, press Create Room. The match lobby will materialize, and you can invite friends via the invite panel. Your private battlefield is now live.
Why Custom Rooms Matter More Than Ever
With the rise of university leagues and streamer tournaments in 2026, Custom Rooms aren’t just a toy – they’re the workshop where champions are forged. I personally use them to test new character combos like a chef experimenting with recipes, free from the chaos of public kitchens. If you’re looking to improve, don’t grind blindly; set up a room with friends and dissect every fight.
A Few Pro Tips
-
Bookmark your settings: Save different configs for different practice types (e.g., “1v1 sniper”, “4v4 scrim”).
-
Rotate passwords: Keep your room secure by changing the password between sessions.
-
Use warm‑up modes: Rush Hour and Battle Cage are excellent for aim training before a serious match.
Creating a Custom Room in Free Fire is like unlocking a secret level in a game you thought you knew. It hands you the reins and lets you drive. So next time you’re in the lobby, gather your squad and build the dream match you’ve always wanted to play. I’ll see you on the battlefield – maybe even inside your own room.